
ADDING ARTWORK TO YOUR PCBS
If you’re anything like me, You can’t resist cracking open a new pedal to peek at what treasures lay hidden inside! Sometimes you’re rewarded with more than just a city of electronic components and you get a bit of artwork as well.
Since I first started designing my own PCBs I’ve dreamt about applying artwork to the boards but there was a real lack of resources teaching you how to do so online which led to me to learn through trial and error (along with some help from fellow builders). Luckily it was a lot simpler than I initially expected so I figured a few people would find it helpful if I explained the process I use.
First things first, you need to be pretty comfortable using Eagle Software. I don’t use any other programs for board design so unfortunately I can only help with Eagle sorry!
When you have settled on your component placements and routed everything to the point where the board is basically ready to send off for fabrication you can add the artwork to the board as a final touch.
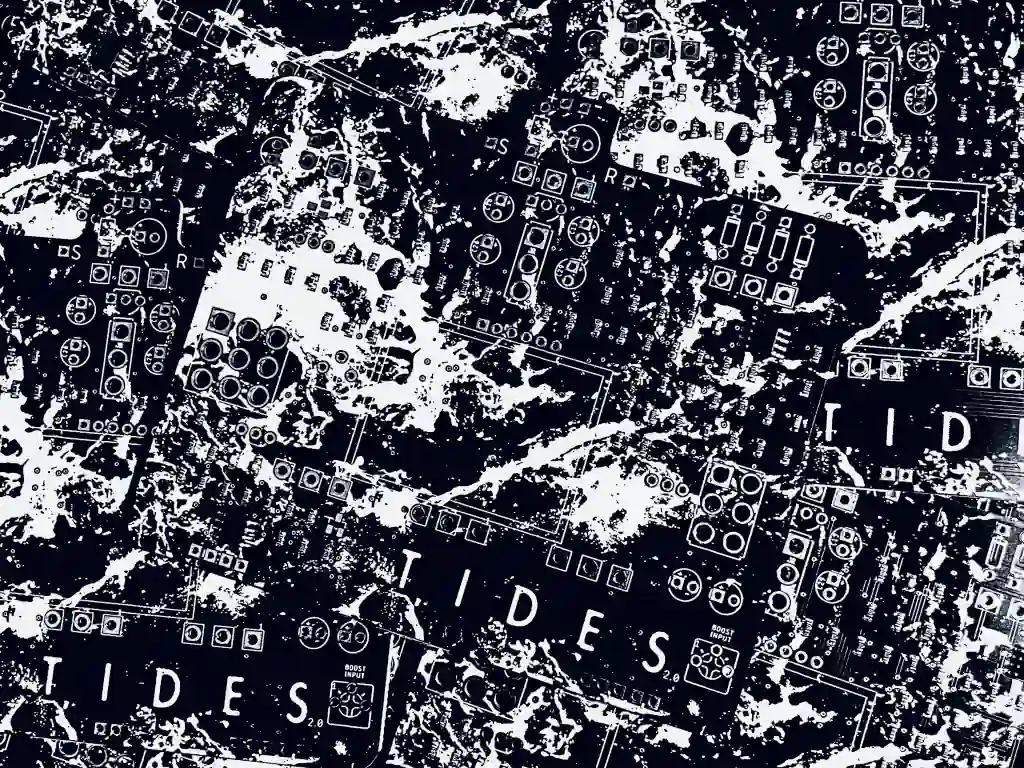
I like to use textural artwork that covers the entire board as a reflection of the artwork printed on the outside of the pedal but don’t feel like you need to do the same. You could add icons, logos or even just fancy text to your boards to set them apart from other PCBs.
EXPORTING THE BOARD LAYOUT
The first thing I do when I’ve finished laying out my board is to export it as an image I can load into Photoshop. When you bring the image into Photoshop it won’t be scaled at 100% it’s usually a little bigger so you need to measure your board so you can scale down the board to its actual size.
The easiest way to do this is to use the measure tool in Eagle to measure the width and length of your board. You can then create a new document in Photoshop with the same dimensions as your board. To do this click File > New > Set your width and height and set the resolution to 300 Pixels/Inch (DPI).
Copy the board over from your previous document and use the Transfrom tool to scale it down to the edges of the document.
CREATING THE ARTWORK
I tend to design artwork for the board while in the larger document to retain a bit of clarity through working at a higher resolution.
You can look for the spaces on the PCB that are void of components to place text or images but don’t feel like you have to keep all artwork to those spaces as you can also place artwork over the top of component footprints.
If you do put artwork over the footprints you should make sure you’ll be able to remember what component goes where when you’re populating the board.
IMPORTING THE ARTWORK BACK INTO EAGLE
Once you have added your artwork to the Photoshop document you can hide the layer containing the exported image of the PCB.
You will now need to convert the document to a bitmap file which can be imported into Eagle. To do this you need to first select Mode from the toolbar and select Grayscale.
Once that has converted you need to select Mode from the toolbar again and select Bitmap. You will need to set the Output to 300 pixels/inch and have the Method set to ‘Diffusion Dither’.
Now you need to save the document as a Bitmap file using the .BMP extension.
Next we need to import that saved Bitmap file we just created into Eagle.
Open the project you want to add the artwork to. Select File from the toolbar then select Import and choose Bitmap. Click OK to the message that pops up and then you will be asked to select the Bitmap file you want to import so choose the artwork you just saved.
You will be asked to select what colours you want to use. Select Black and press OK.
On the next screen you need to set the format to DPI, The unit to Inch, the DPI value to 300 and finally the set the destination layer to 21 and click OK.
Eagle will take a minute or two to configure itself and then a small window will appear.
Click Run Script and EAGLE will slowly start importing your artwork. If you are importing a larger artwork this may take a while so be patient while it recreates your artwork line by line.
Once the artwork is fully imported you can move it by choosing Rectangle from the selection filter using the Group tool to select the entire artwork and then use the Move tool to position the artwork where you’d like it.
That’s it! Sit back and admire your handiwork and your board is ready for fabrication!
ADDING ARTWORK TO YOUR PCBS
If you’re anything like me, You can’t resist cracking open a new pedal to peek at what treasures lay hidden inside! Sometimes you’re rewarded with more than just a city of electronic components and you get a bit of artwork as well.
Since I first started designing my own PCBs I’ve dreamt about applying artwork to the boards but there was a real lack of resources teaching you how to do so online which led to me to learn through trial and error (along with some help from fellow builders). Luckily it was a lot simpler than I initially expected so I figured a few people would find it helpful if I explained the process I use.
First things first, you need to be pretty comfortable using Eagle Software. I don’t use any other programs for board design so unfortunately I can only help with Eagle sorry!
When you have settled on your component placements and routed everything to the point where the board is basically ready to send off for fabrication you can add the artwork to the board as a final touch.
I like to use textural artwork that covers the entire board as a reflection of the artwork printed on the outside of the pedal but don’t feel like you need to do the same. You could add icons, logos or even just fancy text to your boards to set them apart from other PCBs.
EXPORTING THE BOARD LAYOUT
The first thing I do when I’ve finished laying out my board is to export it as an image I can load into Photoshop. When you bring the image into Photoshop it won’t be scaled at 100% it’s usually a little bigger so you need to measure your board so you can scale down the board to its actual size.
The easiest way to do this is to use the measure tool in Eagle to measure the width and length of your board. You can then create a new document in Photoshop with the same dimensions as your board. To do this click File > New > Set your width and height and set the resolution to 300 Pixels/Inch (DPI).
Copy the board over from your previous document and use the Transfrom tool to scale it down to the edges of the document.
CREATING THE ARTWORK
I tend to design artwork for the board while in the larger document to retain a bit of clarity through working at a higher resolution.
You can look for the spaces on the PCB that are void of components to place text or images but don’t feel like you have to keep all artwork to those spaces as you can also place artwork over the top of component footprints.
If you do put artwork over the footprints you should make sure you’ll be able to remember what component goes where when you’re populating the board.
IMPORTING THE ARTWORK BACK INTO EAGLE
Once you have added your artwork to the Photoshop document you can hide the layer containing the exported image of the PCB.
You will now need to convert the document to a bitmap file which can be imported into Eagle. To do this you need to first select Mode from the toolbar and select Grayscale.
Once that has converted you need to select Mode from the toolbar again and select Bitmap. You will need to set the Output to 300 pixels/inch and have the Method set to ‘Diffusion Dither’.
Now you need to save the document as a Bitmap file using the .BMP extension.
Next we need to import that saved Bitmap file we just created into Eagle.
Open the project you want to add the artwork to. Select File from the toolbar then select Import and choose Bitmap. Click OK to the message that pops up and then you will be asked to select the Bitmap file you want to import so choose the artwork you just saved.
You will be asked to select what colours you want to use. Select Black and press OK.
On the next screen you need to set the format to DPI, The unit to Inch, the DPI value to 300 and finally the set the destination layer to 21 and click OK.
Eagle will take a minute or two to configure itself and then a small window will appear.
Click Run Script and EAGLE will slowly start importing your artwork. If you are importing a larger artwork this may take a while so be patient while it recreates your artwork line by line.
Once the artwork is fully imported you can move it by choosing Rectangle from the selection filter using the Group tool to select the entire artwork and then use the Move tool to position the artwork where you’d like it.
That’s it! Sit back and admire your handiwork and your board is ready for fabrication!